ThemeJam
Organic Themes

Wednesday, February 2, 2011

View and Share Documents Online

Zoho Viewer is an online file viewer that lets you read PDFs, OpenOffice and Microsoft Office documents in the browser without even requiring you to sign-up for an account.

To get started, simply go to viewer.zoho.com, upload your file(s) and publish.  You can upload files as large as 10 MB in a single batch.

Monday, January 31, 2011

Change default dictionary in Microsoft Office 2010

If you click Add to Dictionary when you run the spelling checker on your document, Word adds the new word to the default custom dictionary. To change the default dictionary to the one that you added, follow these steps:

1. In Word 2003 and in earlier versions of Word, click Options on the Tools menu.

    In Word 2007, click the Microsoft Office Button, and then click Word Options.

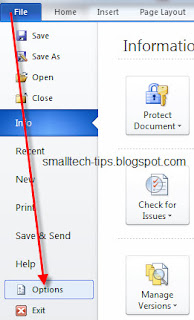
    In Word 2010, click File, and then click Options.


2. In Word 2003 and in earlier versions of Word, click the Spelling & Grammar tab, and then click Custom Dictionaries.

    In Word 2007 and Word 2010, click Proofing, and then click Custom Dictionariesunder When correcting spelling in Microsoft Office programs.


3. Click the name of the dictionary that you want to set as the default, and then clickChange Default.


    Note The default dictionary is positioned at the top of the list. Additionally, its name is listed in bold characters.
4. Click OK two times.

Keyboard shortcuts for Windows

Windows system key combinations

  • F1: Help
  • CTRL+ESC: Open Start menu
  • ALT+TAB: Switch between open programs
  • ALT+F4: Quit program
  • SHIFT+DELETE: Delete item permanently
  • Windows Logo+L: Lock the computer (without using CTRL+ALT+DELETE)

Windows program key combinations

  • CTRL+C: Copy
  • CTRL+X: Cut
  • CTRL+V: Paste
  • CTRL+Z: Undo
  • CTRL+B: Bold
  • CTRL+U: Underline
  • CTRL+I: Italic

Mouse click/keyboard modifier combinations for shell objects

  • SHIFT+right click: Displays a shortcut menu containing alternative commands
  • SHIFT+double click: Runs the alternate default command (the second item on the menu)
  • ALT+double click: Displays properties
  • SHIFT+DELETE: Deletes an item immediately without placing it in the Recycle Bin

General keyboard-only commands

  • F1: Starts Windows Help
  • F10: Activates menu bar options
  • SHIFT+F10 Opens a shortcut menu for the selected item (this is the same as right-clicking an object
  • CTRL+ESC: Opens the Start menu (use the ARROW keys to select an item)
  • CTRL+ESC or ESC: Selects the Start button (press TAB to select the taskbar, or press SHIFT+F10 for a context menu)
  • CTRL+SHIFT+ESC: Opens Windows Task Manager
  • ALT+DOWN ARROW: Opens a drop-down list box
  • ALT+TAB: Switch to another running program (hold down the ALT key and then press the TAB key to view the task-switching window)
  • SHIFT: Press and hold down the SHIFT key while you insert a CD-ROM to bypass the automatic-run feature
  • ALT+SPACE: Displays the main window's System menu (from the System menu, you can restore, move, resize, minimize, maximize, or close the window)
  • ALT+- (ALT+hyphen): Displays the Multiple Document Interface (MDI) child window'sSystem menu (from the MDI child window's System menu, you can restore, move, resize, minimize, maximize, or close the child window)
  • CTRL+TAB: Switch to the next child window of a Multiple Document Interface (MDI) program
  • ALT+underlined letter in menu: Opens the menu
  • ALT+F4: Closes the current window
  • CTRL+F4: Closes the current Multiple Document Interface (MDI) window
  • ALT+F6: Switch between multiple windows in the same program (for example, when the Notepad Find dialog box is displayed, ALT+F6 switches between the Find dialog box and the main Notepad window)

Shell objects and general folder/Windows Explorer shortcuts

For a selected object:
  • F2: Rename object
  • F3: Find all files
  • CTRL+X: Cut
  • CTRL+C: Copy
  • CTRL+V: Paste
  • SHIFT+DELETE: Delete selection immediately, without moving the item to the Recycle Bin
  • ALT+ENTER: Open the properties for the selected object

To copy a file

Press and hold down the CTRL key while you drag the file to another folder.

To create a shortcut

Press and hold down CTRL+SHIFT while you drag a file to the desktop or a folder.

General folder/shortcut control

  • F4: Selects the Go To A Different Folder box and moves down the entries in the box (if the toolbar is active in Windows Explorer)
  • F5: Refreshes the current window.
  • F6: Moves among panes in Windows Explorer
  • CTRL+G: Opens the Go To Folder tool (in Windows 95 Windows Explorer only)
  • CTRL+Z: Undo the last command
  • CTRL+A: Select all the items in the current window
  • BACKSPACE: Switch to the parent folder
  • SHIFT+click+Close button: For folders, close the current folder plus all parent folders

Windows Explorer tree control

  • Numeric Keypad *: Expands everything under the current selection
  • Numeric Keypad +: Expands the current selection
  • Numeric Keypad -: Collapses the current selection.
  • RIGHT ARROW: Expands the current selection if it is not expanded, otherwise goes to the first child
  • LEFT ARROW: Collapses the current selection if it is expanded, otherwise goes to the parent

Properties control

  • CTRL+TAB/CTRL+SHIFT+TAB: Move through the property tabs

Accessibility shortcuts

  • Press SHIFT five times: Toggles StickyKeys on and off
  • Press down and hold the right SHIFT key for eight seconds: Toggles FilterKeys on and off
  • Press down and hold the NUM LOCK key for five seconds: Toggles ToggleKeys on and off
  • Left ALT+left SHIFT+NUM LOCK: Toggles MouseKeys on and off
  • Left ALT+left SHIFT+PRINT SCREEN: Toggles high contrast on and off

Microsoft Natural Keyboard keys

  • Windows Logo: Start menu
  • Windows Logo+R: Run dialog box
  • Windows Logo+M: Minimize all
  • SHIFT+Windows Logo+M: Undo minimize all
  • Windows Logo+F1: Help
  • Windows Logo+E: Windows Explorer
  • Windows Logo+F: Find files or folders
  • Windows Logo+D: Minimizes all open windows and displays the desktop
  • CTRL+Windows Logo+F: Find computer
  • CTRL+Windows Logo+TAB: Moves focus from Start, to the Quick Launch toolbar, to the system tray (use RIGHT ARROW or LEFT ARROW to move focus to items on the Quick Launch toolbar and the system tray)
  • Windows Logo+TAB: Cycle through taskbar buttons
  • Windows Logo+Break: System Properties dialog box
  • Application key: Displays a shortcut menu for the selected item

Microsoft Natural Keyboard with IntelliType software installed

  • Windows Logo+L: Log off Windows
  • Windows Logo+P: Starts Print Manager
  • Windows Logo+C: Opens Control Panel
  • Windows Logo+V: Starts Clipboard
  • Windows Logo+K: Opens Keyboard Properties dialog box
  • Windows Logo+I: Opens Mouse Properties dialog box
  • Windows Logo+A: Starts Accessibility Options (if installed)
  • Windows Logo+SPACEBAR: Displays the list of Microsoft IntelliType shortcut keys
  • Windows Logo+S: Toggles CAPS LOCK on and off

Dialog box keyboard commands

  • TAB: Move to the next control in the dialog box
  • SHIFT+TAB: Move to the previous control in the dialog box
  • SPACEBAR: If the current control is a button, this clicks the button. If the current control is a check box, this toggles the check box. If the current control is an option, this selects the option.
  • ENTER: Equivalent to clicking the selected button (the button with the outline)
  • ESC: Equivalent to clicking the Cancel button
  • ALT+underlined letter in dialog box item: Move to the corresponding item

How to add a custom dictionary in Microsoft Office 2010?

To create an additional custom dictionary, follow these steps:
1. Start Word.
2. In Microsoft Office Word 2003 and in earlier versions of Word, click Options on theTools menu.

    In Microsoft Office Word 2007, click the Microsoft Office Button, and then click Word Options.

     In Microsoft Office Word 2010, click File, and then click Options.

3. In Word 2003 and in earlier versions of Word, click Custom Dictionaries on theSpelling & Grammar tab.
    In Word 2007 and Word 2010, click Proofing, and then click Custom Dictionaries under When correcting spelling in Microsoft Office programs.


4. Click New to create a new custom dictionary.
5. In the File name box, type a name for the new custom dictionary, and then click Save.
6. In the Custom Dictionaries dialog box, click OK, and then click OK in the Optionsdialog box.

Friday, January 28, 2011

Using Screenshot in Office 2010


Screenshot -- a new feature in Office 2010 -- allows you to capture images from your screen.


  • Click the document that you want to add the screenshot to
  • Click the Insert tab on the Ribbon
  • In the Illustrations group, click Screenshot


  • To add the whole window, click the thumbnail in the Available Windows gallery
  • To add part of the window, click Screen Clipping, and when the pointer becomes a cross, press and hold the left mouse button to select the area of your screen that you want to capture

  • If you have multiple windows open, click the window you want to clip from before clicking Screen Clipping. When you click Screen Clipping, the program you are working in is minimized and only the window behind it is available for clipping

  • After adding a screenshot, you can use the tools on the Picture Tools tab to edit and enhance the screenshot
You can use Screenshot in Word 2010, PowerPoint 2010 and Excel 2010.

Twitter Delicious Facebook Digg Stumbleupon Favorites More